Your part is done, now what? What do you do first when taking the part out of the mold? Do you remove the peel ply while the part is in the mold or leave it and remove it later? What kind of wedges or tools are needed to remove the part without destroying the part or the mold at the same time? The following will help answer all these questions and more as we dive into demolding your composite part.
The Demold Process Starts Before Plycut
90% of demolding occurs within the tooling design, layup, and the tool’s preparation processes. With these three keys taken care of before the part’s layup, all that is needed is cut protective gloves, safety glasses, a brass scraper or small fiberglass shim, and possibly a rubber mallet.
Demold in Functional Tool Design
In crafting and designing a part and layup mold, the parts demold process should be one of the top 5 criteria in tool design. Keep the layup mold as simple as possible. Suppose it is known that negative draft angles or sharp radii will be a factor in the part design. In that case, using a multi-segmented mold may be in order or use of secondary bonding of 2 composite pieces instead of complicating a tooling system. In short, the design should simplify the demold process until there is a comfortable experience established in demold AND tool design.
Demold in Layup
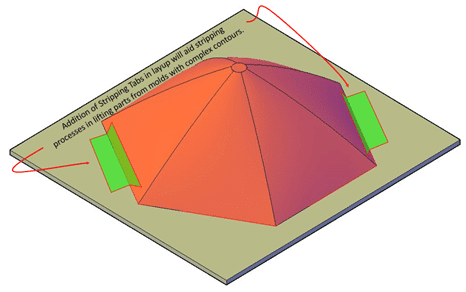
Demold also can be aided in layup through ply design. For instance, laying up into a bowl-like part. Demold tabs are easily added to the top of the bowl with sacrificial material and are widely useful in aiding the demold process. These tabs can be made from the extra plies in the layup or fiberglass just lying around. Place these plies in an excess area beyond the part’s final trim line, and there will be no remnant of it left in the final part. It will aid the demold process tremendously as the part will pop out with ease each time.

A quality check of prepped mold surfaces for a proper application of mold release will be needed, along with a useful tool design and layup processes. It is ideal for keeping a record of tooling prep for any given tool with information such as what release is placed onto it, how it was applied, and the time and date in which it was applied.
During the demold process, practice makes perfect. The above criteria will mitigate any chances of human error. Experience with each material system helps with stripping parts as each is a little different.
Reference Safety 101, Demold and Mold Prep Safety
Always use cut-resistant gloves as most composites’ edges are sharper than most knife blades in any given home. It does not take much to need stitches. Always wear proper eye protection as chips and resin bleed out can be expected, and pieces may fly out and into the eyes.
Whether the composite is out of the oven, autoclave, or air cure, let the part cool to a temperature that allows for demold. There is no use in burning oneself on a hot tool. Besides, a cool tool will be easier to strip from a mold surface than a hot one.
It is best practice to get peel ply and any other taping/resin damming surfaces off the composite laminate. Getting these materials off is easier with a part placed stationary on the mold surface rather than when it is stripped from the mold surface. Doing so also mitigates the chance of being cut by a part’s edge before deburring.
Place any non-marking shim between the tool surface and the part. The sharper the edge, the more likely it will get between them very quickly. The use of a rubber mallet may come in handy when initially creating separation between the part and tool surface. It is crucial to have a shim that is composite, brass, or non-marking. Most metal shims will leave marks on most tooling surfaces. Once the shim is placed, wiggle shim up/down, creating a fulcrum, and lift the part from the tooling surface. With this process, be mindful of draft angles and the possibility of fiber damage within the laminate. Do not use excessive force. If the part does not easily come up from hand pressure, place additional shims into the area until the part frees from the mold. Note:
Once the shim is placed in the laminate, an air gun may be used to create additional separation from the mold and can be used to remove laminate from the mold surface.
After the part is out of the mold, place it out of the immediate traffic area or immediately deflash part edges. Once deflashed, wrapping parts completely or around edges with bubble wrap will mitigate the chances of damage. The best practice is keeping parts wrapped in bubble wrap when not in use, and while being transported or stored.
Promptly after demolding, it is vital to clean the tool using alcohol if the mold release is compatible. Always reference respective technical datasheets for application of mold release. Check the material specification for information regarding mold releases as some will come off with alcohol application. Once the mold is clean, apply at least 2-3 coats of respective release. Place a tag onto the mold surface for knowing the details.
